WordPress is the most popular CMS software to create websites. What is WordPress and how to install it? We will discuss it in detail in this article.
Table of Contents
- What Is WordPress?
- Why Choose WordPress to Create a Website?
- What Types of Websites Can You Make Using WordPress?
- Which Websites Are Already Using WordPress?
- What’s the Difference Between WordPress.org and WordPress.com?
- What Is Required To Create A Website Using WordPress?
- What Are the Steps to Install WordPress?
- Installing WordPress on Namecheap Web Hosting
- Installing WordPress on DreamHost Web Hosting
- Installing WordPress on Bluehost Web Hosting
- Installing WordPress on HostGator Web Hosting
- Installing WordPress on Niagahoster Web Hosting
- Installing WordPress Using Softaculous
- Installing WordPress Using QuickInstall
- Installing WordPress Using FTP
- Installing WordPress Using SSH
- What To Do After Installing WordPress?
- Conclusion
What Is WordPress?
Nowadays creating a website is very easy. Why? Because now there are many CMS (Content Management Systems) available, which allow you to create a website without having to understand programming languages.
One of the most popular CMS software is WordPress.
WordPress is a CMS (Content Management System) software which is open source and released under the GNU General Public License. WordPress can be used to create various types of websites, such as blogs, online stores, news portals, school websites, company profiles, discussion forums, social media websites, e-learning systems, and many others.
According to statistical data, currently more than 35.7% of websites on the internet are made using WordPress. This shows that WordPress is very popular and is preferred over other CMS.
Why Choose WordPress to Create a Website?
Actually, there are many choices of software tools other than WordPress if you want to create a website, for example, Drupal, WIX, Squarespace, Hubspot CMS, or Weebly. The question is, why choose WordPress over the others?
Here are some important reasons why you should choose WordPress to create a website:
- WordPress Is Free: Yes, you can use WordPress for free, without having to buy a software license. Why? Because WordPress is an open source project and released under the GNU General Public License.
- Customization Is Easy: You can customize WordPress according to your needs without any limitations.
- Visual Editing: WordPress is equipped with visual-based editing features. This means you can create or edit website content easily.
- SEO Friendly: Setting up SEO is very easy if you use WordPress. Of course you have to understand the basics of SEO, but with the help of SEO plugins you can get satisfactory results.
- Themes and Plugins: It’s quite easy to find themes and plugins if you want to change the look or add new features to your website.
- Community Support: Whenever you encounter a problem while using WordPress, you can easily find a solution because the community of WordPress users is huge.
- Full Control: You will get full control of your website if you use WordPress. You are free to change the website or modify it according to your needs.
What Types of Websites Can You Make Using WordPress?
In the beginning, WordPress was a software tool for creating blogs. Over time, WordPress has developed into a versatile CMS. You can create any type of website with WordPress.
Here are some types of websites that you can create using WordPress:
- Blog: Want to build personal branding? The easiest way is to create a blog and write articles regularly on the blog.
- Business Website: In general, a business website is useful for promoting a business via the internet. If you have a company, you can create a business website so that your business is more widely known.
- Online Store: Want to sell products or services online? The solution is to create an online store. You can use WooCommerce to create an online store on WordPress.
- Portfolio Website: In general, portfolio websites are useful for providing information about individuals or companies and showcasing their work. If you are a designer, illustrator or photographer, you can create a portfolio website to showcase your work online.
- News Websites: In general, news websites are useful for publishing news online, for example, Detik.com, Tribunnews.com, Kompas.com and Goal.com. You can use WordPress if you want to create a news website like this example.
- School Website: In general, the school website is useful for providing information about the profile of a school, educational curriculum, teaching and learning activities, news and agenda of the school’s activities. You can use WordPress to create a school website.
- Online Forums: In general, online forums are a type of website where everyone can join to discuss certain topics, for example, Quora, Stack Overflow and TripAdvisor. You can use WordPress if you want to create an online forum like this example.
- Website Membership: In general, website membership is a type of website where there is certain content that can only be accessed by members (members). Website membership can be free or paid. Examples of membership websites are Orchids Made Easy, Smart Blogger, and Succulents and Sunshine. You can use WordPress if you want to create a membership website like the example above.
- Non-profit Websites: In general, non-profit websites are useful for raising funds which will later be used to fund the charitable activities of certain organizations, for example, GoFundMe, Just Giving and Care. You can use WordPress if you want to create a non-profit website like this example.
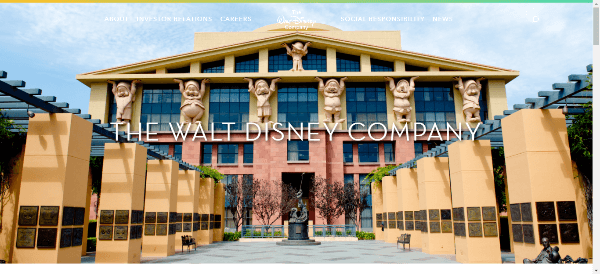
Which Websites Are Already Using WordPress?
It would be wrong if you thought that WordPress was only used by individuals and small businesses. A lot of big companies also use WordPress to create their website.
Here are examples of some well-known websites created using WordPress:


What’s the Difference Between WordPress.org and WordPress.com?
For those of you who have created a free blog at WordPress.com must be wondering whether what is meant in this article is a free blog service or not.
The answer is no.
What is meant in this article is WordPress.org. You don’t need to be confused why there are two versions of WordPress. You can see the difference between the two in the following table.
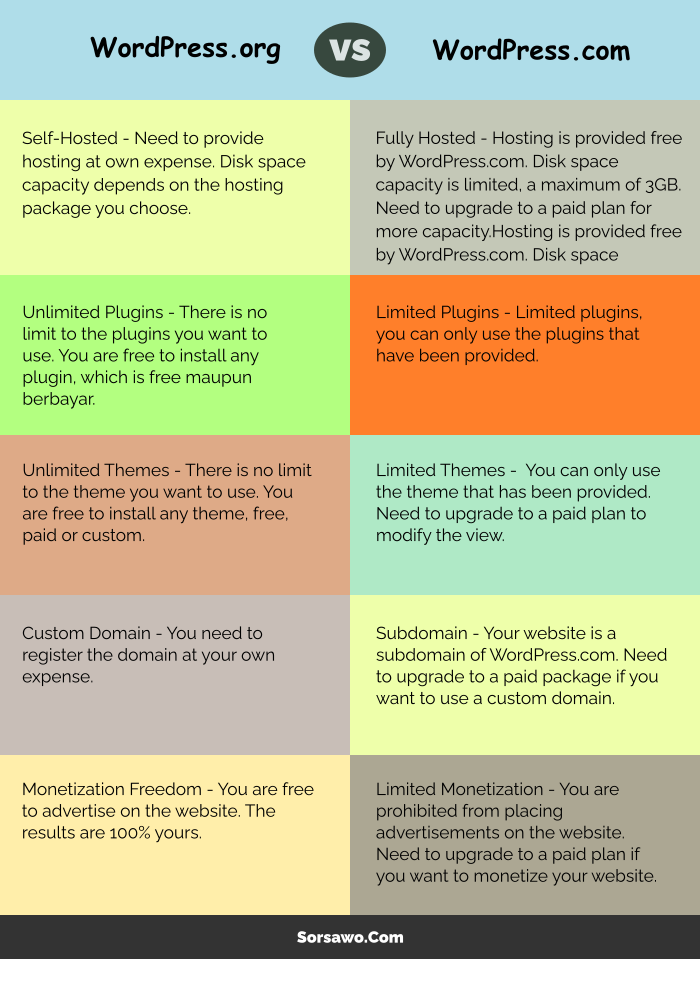
Those are the 5 main differences between the two versions of WordPress. So, do you understand the reason why you should choose WordPress.org?
For more details, read the article what is the difference between WordPress.org and WordPress.com.
What Is Required To Create A Website Using WordPress?
Before installing WordPress, you need to prepare a domain name and web hosting first.
The domain name is the identity or address of a website, for example sorsawo.com. A domain name is needed so that it is easier for visitors to remember your website.
Meanwhile, web hosting is an Internet service that provides a server and its supporting facilities that allow you to publish your website on the Internet so that it can be accessed from all over the world.
There are many web hosting and domain registration service providers that you can choose from, for example DreamHost, Namecheap, Bluehost, HostGator and so on. One thing that you have to pay attention to is that if you want to create your own website, then you need to choose a web hosting service carefully.
The web hosting specifications that you need if you want to create a website with WordPress are as follows:
- Web server Nginx or Apache with
mod_rewritemodule. - Disk space minimal 1 GB.
- PHP version 7.4 or higher.
- MySQL database version 5.7 or higher, or you can also use MariaDB version 10.3 or higher.
- HTTPS support.
What Are the Steps to Install WordPress?
If the domain name and hosting that will be used are ready, then you can install WordPress.
Here are some WordPress installation methods that you can use.
a) Installing WordPress on Namecheap Web Hosting
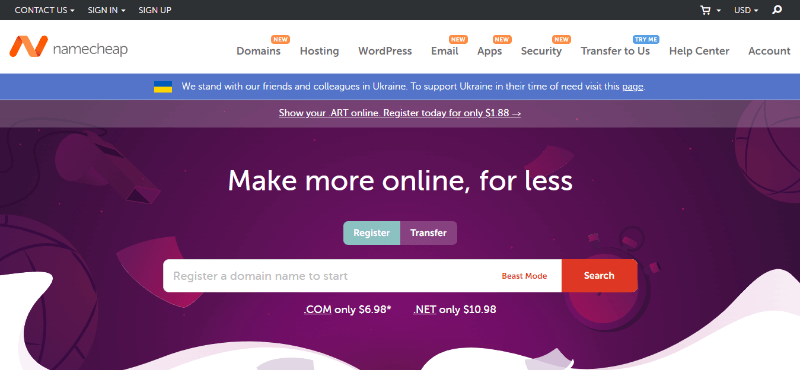
Namecheap is a very popular domain and hosting service provider. There are several WordPress hosting service packages from Namecheap that you can use, namely shared hosting, EasyWP, VPS and dedicated servers.
Especially for shared hosting, there is a Softaculous tool that you can use to install WordPress.
b) Installing WordPress on DreamHost Web Hosting
DreamHost is one of the oldest and most popular hosting service providers in the world. This company has been around since 1996 and offers various hosting packages at low prices.
DreamHost has an option to automatically install WordPress when you sign up for a hosting package.
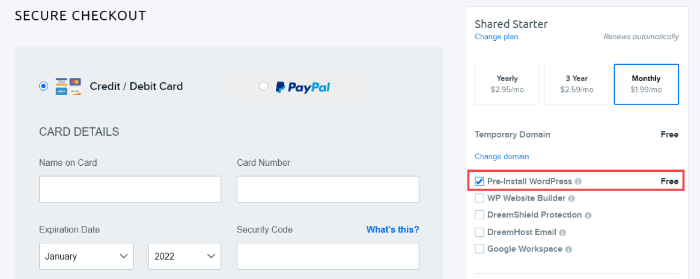
If you select the “Pre-Install WordPress” option, WordPress will be installed automatically. You don’t need to do the installation yourself.
After the installation process is complete you will receive an email from DreamHost with the title “Success installing WordPress on your site!” which contains your website login information. Then you can login to the WordPress administration panel by clicking the link contained in the email.
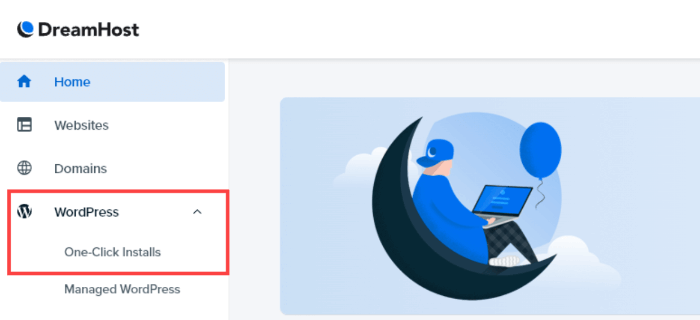
Apart from the Pre-Install WordPress option, you can also install WordPress via the DreamHost admin panel.
Step 1: Login to the DreamHost admin panel.
Step 2: Click WordPress → One-Click Installs.
Step 3: Next you will see a display that contains information about WordPress. Click the Learn More & Install button to continue.

Step 4: Next, the WordPress settings page will appear.
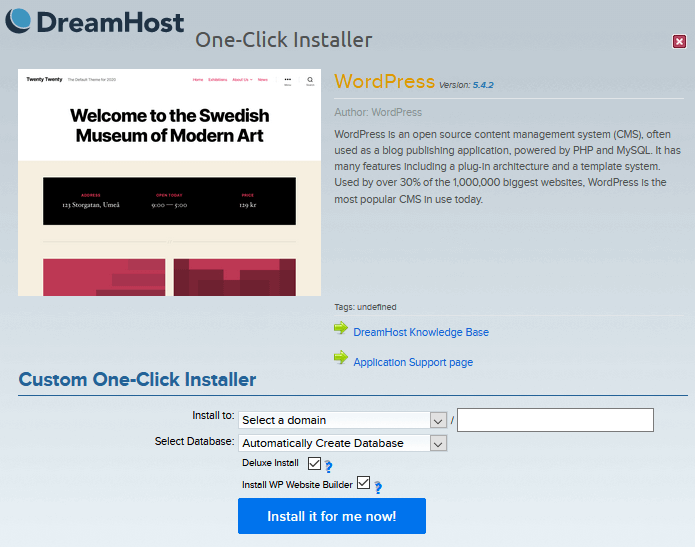
The following data you need to complete:
- Install to: Choose the domain name where you will install WordPress.
- Select Database: Select the “Automatically Create Database” option.
- Deluxe Install: You don’t need to tick the option.
- Install WP Website Builder: You don’t need to tick the option.
After everything is complete, click the Install it for me now button. Wait a few moments and then you will receive an email containing information about your website.
Now WordPress is installed on your hosting. Then you can login to the WordPress administration panel to manage website configuration.
c) Installing WordPress on Bluehost Web Hosting
Bluehost is one of the largest domain and hosting service providers in the world. There are several WordPress hosting service packages from Bluehost that you can use, namely shared hosting, VPS and dedicated hosting.
Here are the steps for installing WordPress on Bluehost:
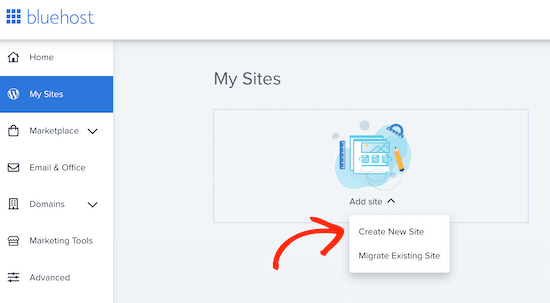
Step 1: Login to Bluehost dashboard.
Step 2: Click the My Sites menu on the Bluehost dashboard. Then click the Add Site button and select the Create New Site menu.
Step 3: Enter your website name and tagline.
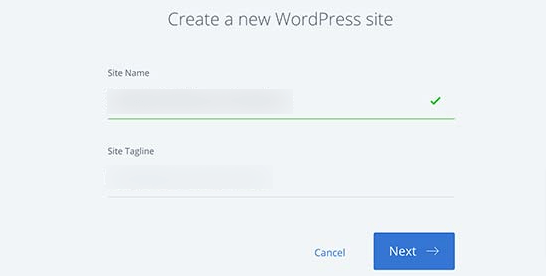
Click the Next button to continue.
Step 4: Choose the domain name where you will install WordPress.
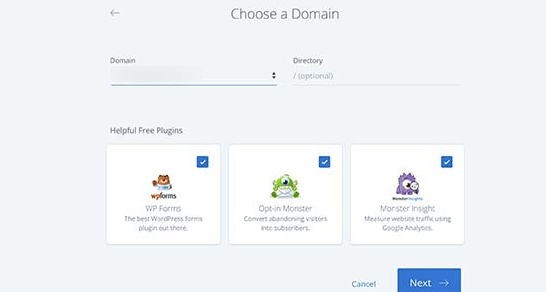
Click the Next button to continue. Wait for the installation process to finish. If successful, then a success message will appear along with your website information.
Now WordPress is installed on your hosting. Then you can login to the WordPress administration panel to manage website configuration.
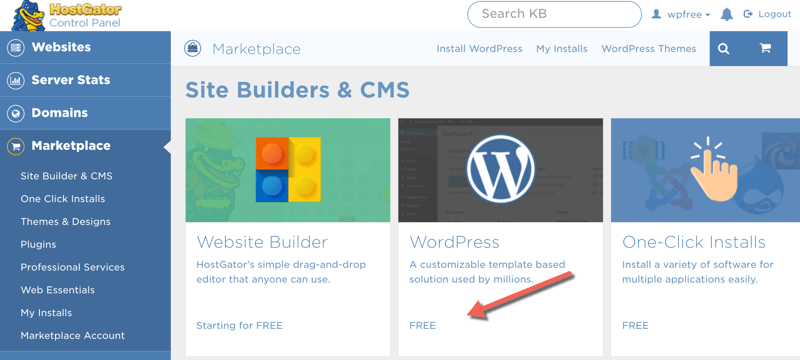
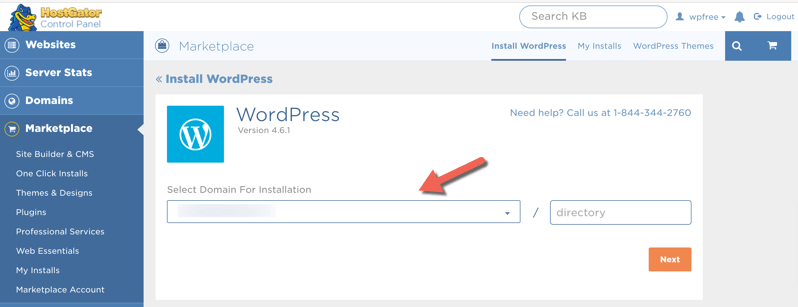
d) Installing WordPress on HostGator Web Hosting
HostGator is a domain and hosting service provider that is quite popular for beginners. There are several WordPress hosting service packages from HostGator that you can use, namely shared hosting, managed WordPress hosting, VPS and dedicated hosting.
For shared hosting, you can install WordPress with QuickInstall. As for VPS and dedicated hosting, the fastest way is to use SSH.
Apart from the method above, you can also install WordPress through the HostGator customer portal.
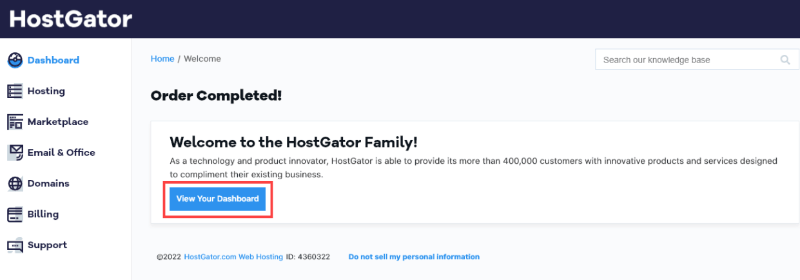
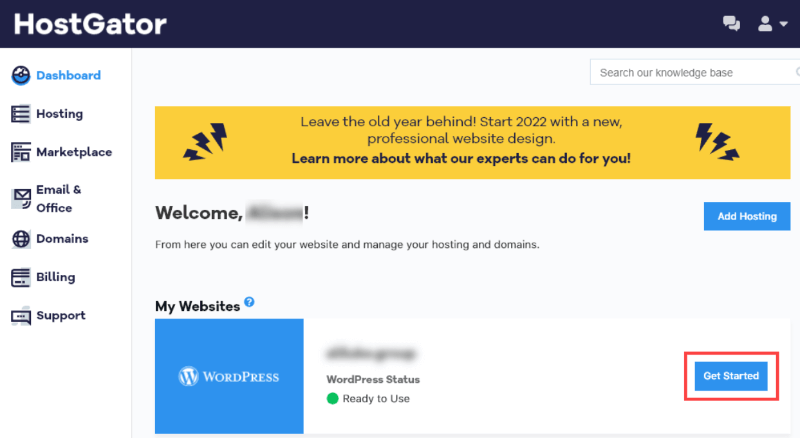
Step 1: You’ll be logged into the customer portal automatically once HostGator has finished setting up your hosting account. Then click the View Your Dashboard button.
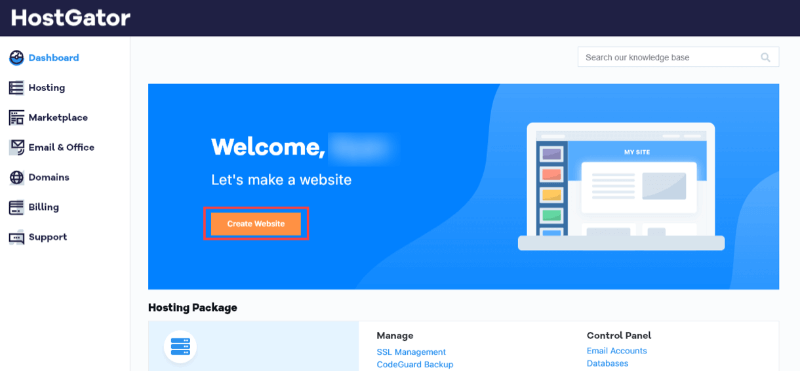
Step 2: Click the Create Website button.
Step 3: Click the Get Started button.
Next, the message “Creating your WordPress account…” will appear for a few minutes. You will see the status “Ready to Use” after the WordPress installation process is complete.
Step 4: Click the Get Started button next to the WordPress status.
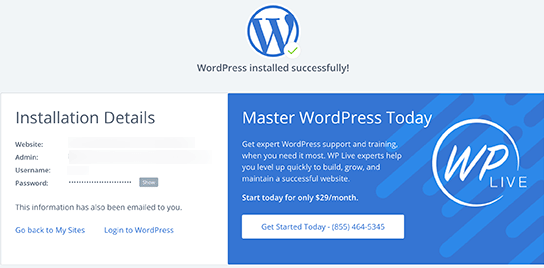
Next you will see the WordPress login information.
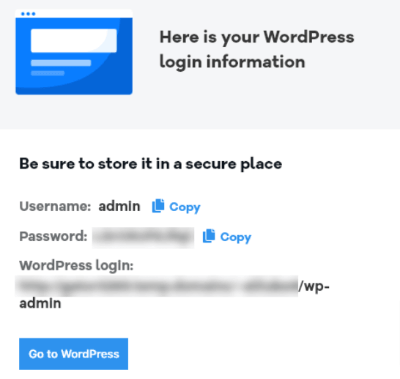
Don’t forget to save the login information before you click the Go to WordPress button.
e) Installing WordPress on Niagahoster Web Hosting
Niagahoster is a domain and hosting service provider that is quite popular in Indonesia. They provide shared hosting, VPS and dedicated hosting service packages.
Niagahoster provides cPanel facilities for each of their customer’s hosting accounts. You can use Softaculous to install WordPress on Niagahoster.
f) Installing WordPress Using Softaculous
Softaculous is an installer tool that allows you to easily install web applications like WordPress in just a few clicks.
Hosting service providers like Namecheap and Niagahoster use Softaculous in their hosting control panel.
Here are the steps for installing WordPress with Softaculous:
Step 1: Login to cPanel using the username and password that you obtained when you purchased the hosting package. If your domain is example.com then the cPanel URL address is cpanel.example.com or example.com/cpanel.
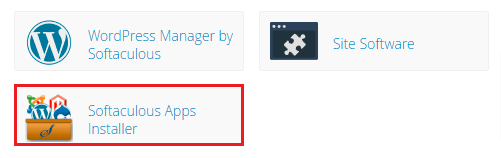
Step 2: Once on the cPanel page, select the Softaculous menu.
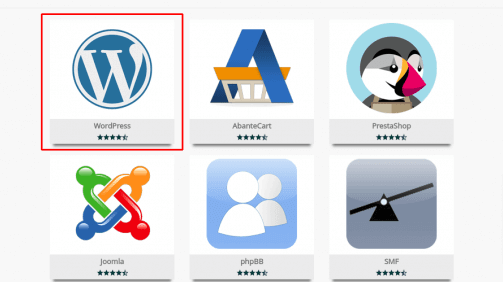
Step 3: Select the software that you will install, namely WordPress.
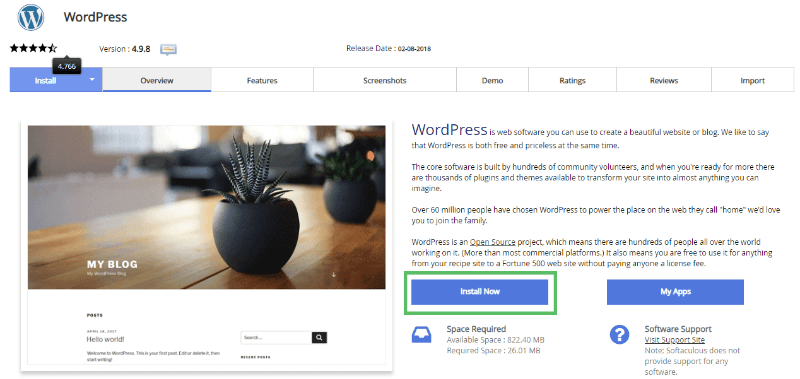
Step 4: Click Install Now.
Step 5: Next you will be redirected to the Software Setup page. Complete the required data.
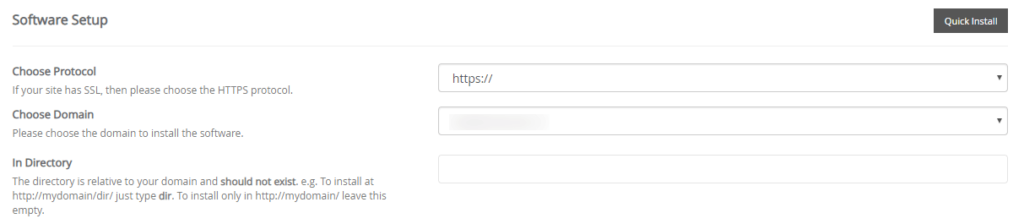
The following data you must enter:
- Choose Protocol – You can choose, if your hosting has previously installed SSL, please select https:// , but if not, please select http://.
- Choose domain – Choose the domain name where you will install WordPress.
- In Directory – If WordPress will be installed on the main domain, please leave it blank.
- Site name – Enter the name or site title of your website.
- Site description – Enter a tagline or a brief description of your website.
- Username – Enter the username that will be used when you login to the WordPress administration panel.
- Password – Enter the password as desired.
- Admin Email – Enter an active email account.
You can ignore fields other than the above.
If everything is filled in, click the “INSTALL” button at the bottom of the form to continue the installation process. If appropriate, it will appear like this:
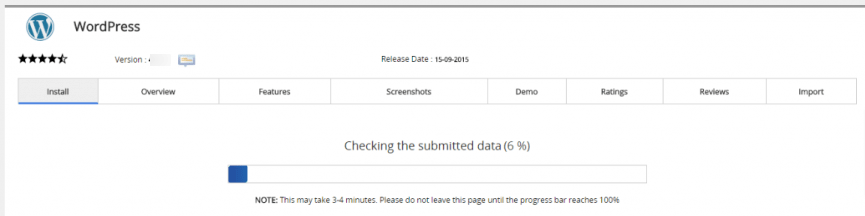
Now WordPress is installed on your hosting. Then you can login to the WordPress administration panel to manage website configuration.
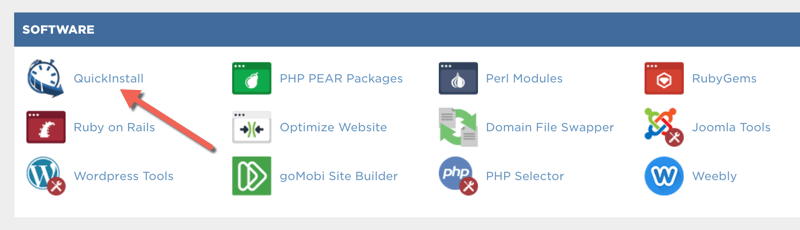
g) Installing WordPress Using QuickInstall
Just like Softaculous, QuickInstall is also an installer tool to ease the WordPress installation process. One hosting service provider that uses it is HostGator.
Here are the steps for installing WordPress using QuickInstall:
Step 1: Login to cPanel using the username and password that you obtained when you purchased the hosting package. If your domain is example.com then the cPanel URL address is cpanel.example.com or example.com/cpanel.
Step 2: Once on the cPanel page, select the QuickInstall menu.
Step 3: Select the software that you will install, namely WordPress.
Step 4: Choose the domain name that you will use to install WordPress. After that click the Next button.
Step 5: Next you will be redirected to the WordPress setup page. Complete the required data.

The following data you must enter:
- Blog Title: Enter the name or title of your website.
- Admin User: Enter the username that will be used when you login to the WordPress administration panel.
- First Name: Enter your first name.
- Last Name: Enter your last name.
- Admin Email: Enter an active email account.
If everything is filled in, click the “Install Now” button to continue the installation process.
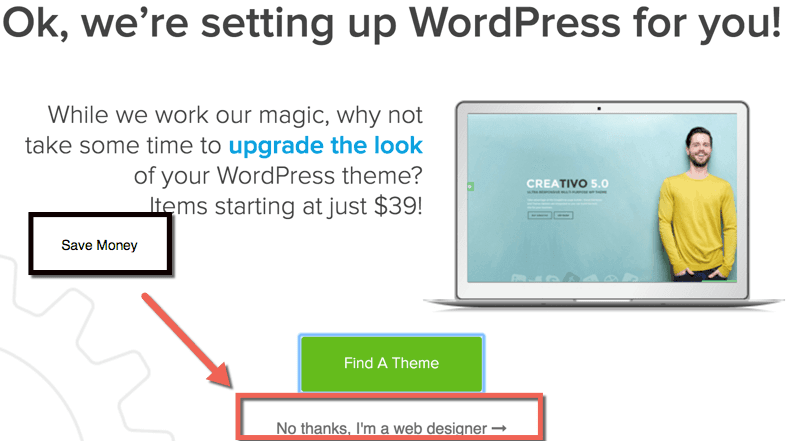
While QuickInstall is carrying out the installation process, an advertisement will usually appear offering to upgrade the service as below. Just ignore it by clicking “No thanks. I’m a web designer”.
Wait until the WordPress installation process is complete. If successful, a display like this will appear:
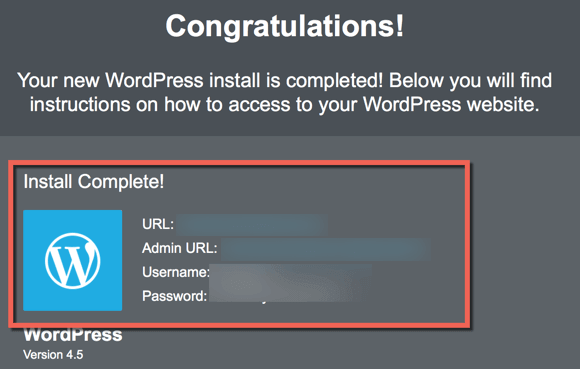
Now WordPress is installed on your hosting. Then you can login to the WordPress administration panel to manage website configuration.
h) Installing WordPress Using FTP
You can install WordPress quickly and easily with the help of Softaculous. However, under certain conditions you have to install WordPress via FTP.
For example, when you want to install WordPress on a VPS. In general, VPS does not come with an installer like Softaculous, so you have to use another method.
The following are the steps for installing WordPress using FTP:
Step 1: Download the WordPress installation file then unzip it on your computer.
Step 2: Upload the unzipped WordPress installation file to the server.
If you want to install WordPress on the main domain, then you have to upload the WordPress installation file in the “public_html” folder.
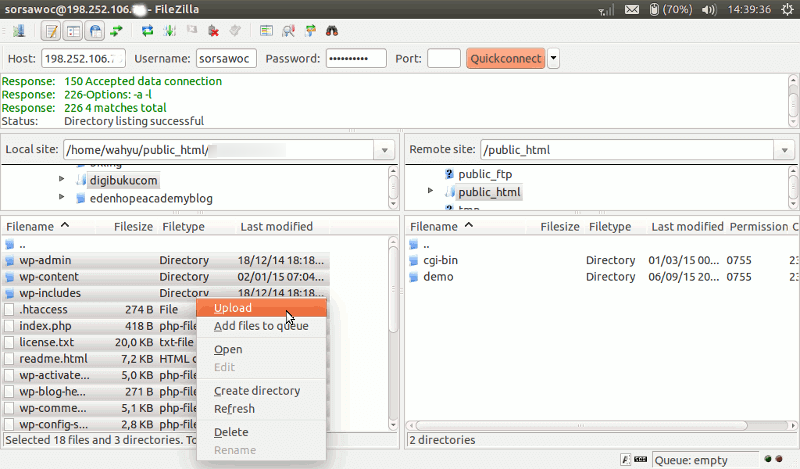
You can upload the WordPress installation file to the server using an FTP client software such as FileZilla.
After FileZilla is installed, run the software and enter the domain name or IP address, username and password for the FTP server you are using in the fields provided.

Click the QuickConnect button and then, if successful, a list of files in your hosting account will appear. Find the “www” or “public_html” folder and double-click it.
To upload the WordPress installation files, select all the files to upload then right click. Then click the Upload menu to start the upload process. Wait until the upload process is complete.
Step 3: Create MySQL databases.
If the hosting you use uses cPanel, you can create a database via cPanel. The method is to first log in to cPanel then click the MySQL Databases icon in the Databases category.
Enter the name of the database you want to create in the New Database field then click the Create Database button.

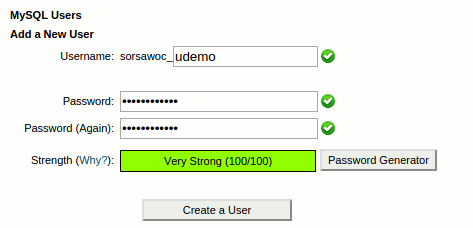
After creating the database, you still have to create a username that will be used to access the database.
On the MySQL Database page in your cPanel account, scroll down to the MySQL Users section. Just provide the username and password for your new username and click the “Create a User” button.
The new username still doesn’t have access to the database you created earlier. For that, you need to add usernames to database and give them permission to perform all actions.
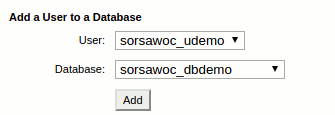
On the same MySQL Database page in your cPanel account, scroll down to the “Add User to a Database” section. Select the username and database then click the Add button.
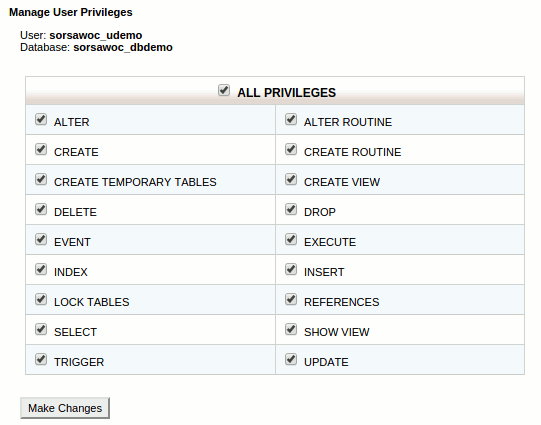
Next you will be asked to choose what privileges you want to give to that username. Select all privileges and click the “Make Changes” button.
Your MySQL database and username are now set up. Save the MySQL database name, username and password. You will need that information later.
Step 4: Run the installation process by accessing the URL address where you uploaded the WordPress installation file, for example example.com.
Next, the language selection page will appear. You can select a language here so that the rest of the installation steps are displayed in your own language.
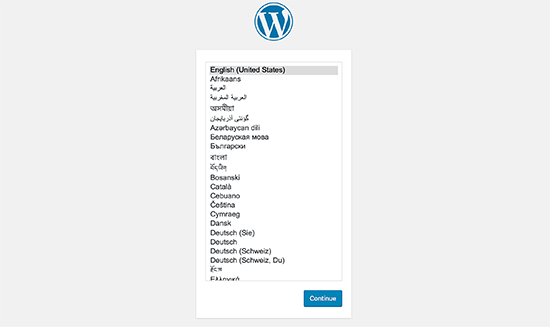
Click the Continue button to continue the installation process.
Next, a page will appear containing instructions for installing WordPress. Basically, WordPress needs your MySQL database name, username, password, and host information to continue with the installation.
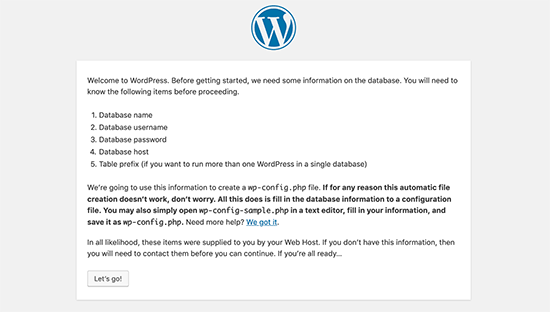
Click the Let’s Go button to continue.
Next, enter database information in the form provided.

Enter the database information then click the Submit button. If the information you entered is correct then a success message will appear.
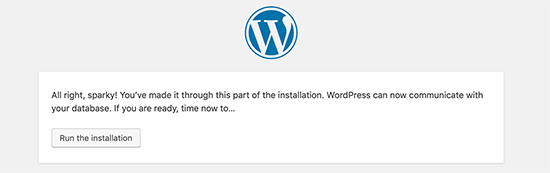
Click the Run the Installation button to continue.
WordPress will now create a table in your database and then direct you to the next installation step.
Next, enter the website title, username, password, and admin email address.
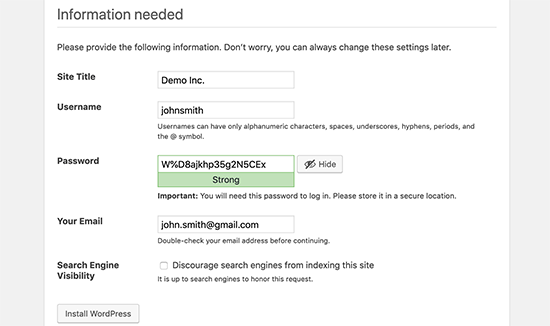
Click the Install WordPress button to continue.
WordPress akan mengatur website Anda dan menyelesaikan instalasi.
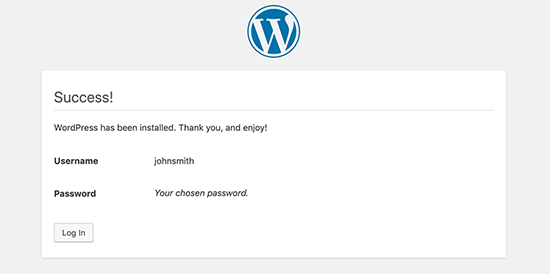
Now WordPress is installed on your hosting. Then you can login to the WordPress administration panel to manage website configuration.
i) Installing WordPress Using SSH
Installing WordPress on VPS and dedicated hosting is not as easy as shared hosting because usually VPS and dedicated hosting do not provide cPanel and Softaculous facilities.
There is an additional fee that you have to pay if you want to use cPanel and Softaculous on VPS and dedicated hosting. The cost is not cheap either.
If the budget you provide for hosting needs is very tight, the cheapest installation method is to use SSH (Secure Shell). But this way is not easy. At least you have to master the Linux operating system.
The following are some tutorials that discuss how to install WordPress with SSH:
What To Do After Installing WordPress?
Ok, now you have successfully installed WordPress. Then you can login to the WordPress administration panel to manage website configurations, create content and so on.
The URL address of the WordPress administration panel is:
www.DOMAINNAME.com/wp-admin/And this is the WordPress login screen you will see.
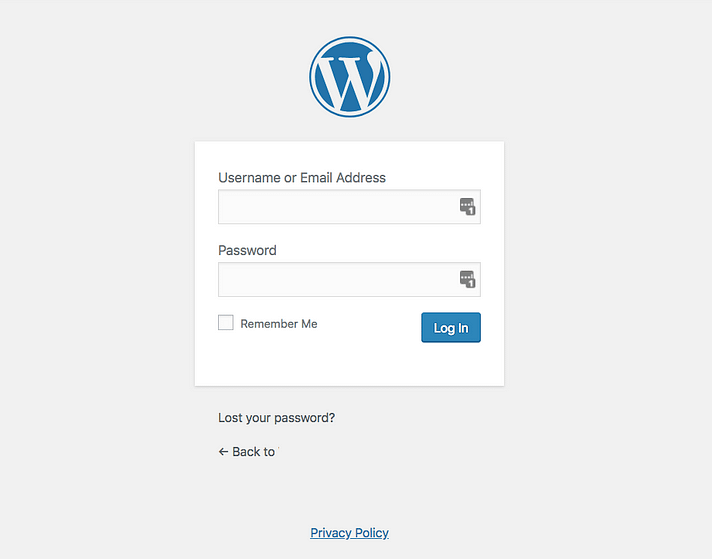
You can use the username, email and password that you created during the WordPress installation process to log in.
And if the login is successful then you will see the main page of the WordPress administration panel like the image below.
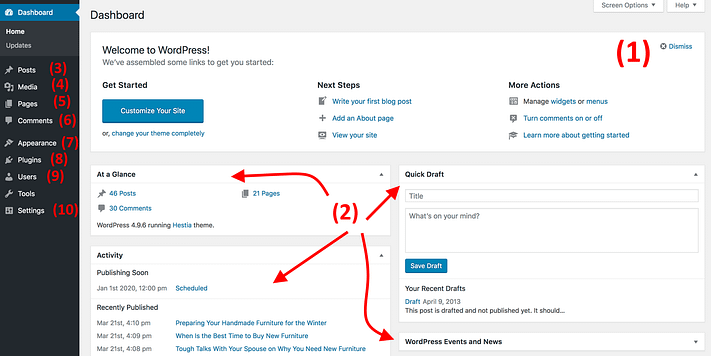
- (1) Welcome message – The most important part of the WordPress administration panel. This area contains several shortcuts for creating a website.
- (2) The current status of your website and what activity has occurred.
- (3) Posts – Go here to post a blog article.
- (4) Media – Upload photos and other media here.
- (5) Pages – Go here to create a web page.
- (6) Comments – Here you can moderate comments.
- (7) Appearance – Change your website design here.
- (8) Plugins – Install the new plugin here.
- (9) Users – Manage user accounts that can access the website administration panel.
- (10) Settings – Website main settings.
As a first step, you can start by changing some of the following basic WordPress settings.
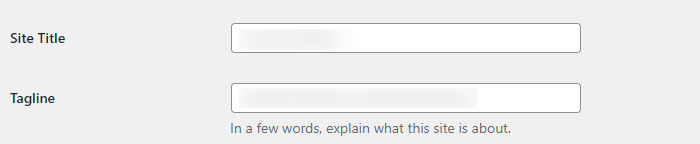
a) Change Site Title and Tagline Settings
Open the settings page Settings → General then enter your website title and tagline. When finished, click Save Changes to save the settings.
b) Change Timezone Settings
Still on the Settings → General settings page, scroll down the admin page then select your time zone in the Timezone section. When finished, click Save Changes to save the settings.

c) Change Search Engine Visibility Settings
Open the settings page Settings → Reading. Make sure the box in the “Search engine visibility” section is unchecked so that Google can find your website. When finished, click Save Changes to save the settings.

d) Change Discussion Settings
Open the settings page Settings → Discussion. Here you can set whether to allow website visitors to comment on articles on your website or not. When finished, click Save Changes to save the settings.

e) Change Pingbacks and Trackbacks Settings
Still on the Settings → Reading settings page, turn off the pingback and trackback settings for articles. When finished, click Save Changes to save the settings.

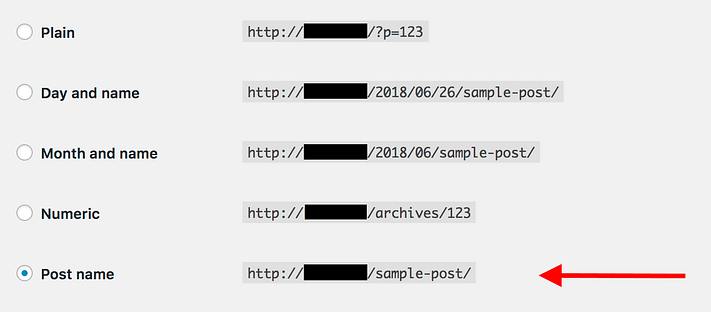
f) Change Permalink Settings
Permalink is a setting in WordPress that will determine how your website page URLs are structured.
Open the settings page Settings → Permalinks. Select the most optimal option that is “Post Name”. When finished, click Save Changes to save the settings.
Those are some basic WordPress settings that you need to set immediately after installing WordPress.
Next what else to do?
There are still many WordPress settings that you have to adjust, but since the discussion is very long, this article only discusses a few basic settings.
Conclusion
We hope this tutorial on how to install WordPress has helped you learn how to create your own website without having to hire anyone.
If you are still having trouble and need help, we also provide website design services that you can use.